maandag 31 augustus 2020

Crealies: Photo Wallet with Envelope Pouch

 
Hi It's Patty

Today I would like to share with you this fun and easy to make
Photo Wallet with Envelope Pouch. 

If your looking for a fun and quick gift to give someone this project is for you. 


The envelope was made using Crea-Nest-Lies XXL no:44  for my base pages and decorated with Crea-Nest-Lies XXL no:56  for that pretty scalloped edging.  To hold all these together I used Mini Album Binding System D no:CLMA11   an added On the Edge no:45  (My new favorite) for my closure on my envelope flap as well as my opened part of my envelope. To keep it all closed I use elastic cording and attached it with Crea-Nest-Lies XXL no:53 

Below you get a better look at the beautiful  On the Edge no:45 

The photo wallet was made using the same dies for the envelope but the next size down.

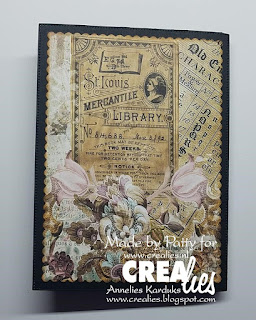
Here is a look at how pretty the front cover its. 

To make this I used Crea-Nest-Lies XXL no:44  again for my base pages and attached them together using Mini Album Binding System C no:CLMA05  I also used this same binding system to attached my photo flaps. 

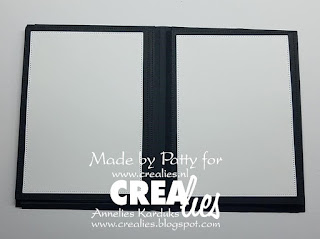
Each side will hold 9 photos as it is shown but you can change up your photo mats to hold more photo in different sizes. 

Once this is fully open you can see all the room for photos you have. 

Below is a picture of the back cover. 
Thank you for stopping by today.
For a walk through of this Photo Wallet please check out the video below. 


Crealies Dies/ Stansen:
Crea-Nest-Lies XXL no:56 
Crea-Nest-Lies XXL no:53 
Crea-Nest-Lies XXL no:44 
On the Edge no:45 
Mini Album Binding System D no:CLMA11  
Mini Album Binding System C no:CLMA05 
Crea-Nest-Lies XXL dies no. 56, Scalloped rectangles Crea-Nest-Lies XXL dies no. 53, Scalloped circles Crea-Nest-Lies XXL dies no. 44, Rectangles with dots On the Edge dies no. 45, 14,5 cm with double stitchline Mini Albums Binding System D (spine 11 mm) with small circles Mini Albums Binding System C (spine 7 mm) with stitchline

zondag 30 augustus 2020

Crealies : Hello watermelon card


Hello Everyone,

I'm stopping by to share this  fun summer card. It's too hot here in Brussels that I can't think of anything else other than watermelons (after beaches :)) to beat this heat..;)..
To make this card, I die cut out white card stock using outermost layer of Crea-Nest-Lies XXL stitched circle dies and folded the same in to half and distress inked the edges using green distress oxide.
Then, I die cut out another circle and cut it in to half and adhered it to the base card with foam tape.
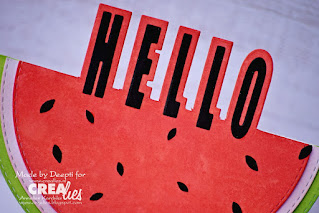
For the red part of the watermelon, I partially die cut out white card stock with sentiment "Hello" using Alfies dies and distress inked it with red color. To add some interest, I sprayed it with water using spray bottle.
After that, I layered the Hello sentiment with black die cut out alphabets. Finally added negative cut out from leaf dies to represent seeds of watermelon.. :). I really enjoyed making this fun card.

I hope you get inspired.
   Thank you so much for stopping by!!

  Hugsxx
Deepti Aggarwal

  I have used following Crealies products:

Crealies Dies / Stansen:

Crealies Mixed Media:

Crealies Basic:

                     Crea-Nest-Lies XXL dies no. 21, Circles with stitchline Duo Dies no. 40A, Leaves 8 mirror image  Alfies die set no. 3, capital letters with shadow   3x Spray bottle (pen) Stamping cardstock, white 240 grams (20x A4)      Black cardboard, 210 grams, for mini albums (20x A4) 

zaterdag 29 augustus 2020

Crealies: Roldoosje


https://all4you-wilma.blogspot.com/2020/08/roldoosje-from-4-to-1-covered-in-bits.html

Hoi, hoi, lieve blogdinnen,

Het doosje van Cardzz no. 25 is niet alleen geschikt
 om op/in een kaart te zetten, maar ook geschikt
 om een roldoosje mee te maken.

 Voor alle 4 de kleine doosjes heb ik 2 delen uit wit
 fluweelkarton en 2 delen uit geel karton gestanst.
Ook de kleine oplegvellen zijn, per doosje, 2x uit
 wit fluweelkarton en 2x uit geel karton gestanst.

Alle randen zijn voorzien van gele inkt.
Het handigst is het om de diverse Bits &
 Pieces te stempelen als alles nog plat ligt.

https://all4you-wilma.blogspot.com/2020/08/roldoosje-from-4-to-1-covered-in-bits.html
Dit is de "achterzijde" van het doosje.

https://all4you-wilma.blogspot.com/2020/08/roldoosje-from-4-to-1-covered-in-bits.html
Zo ziet e.e.a. eruit als de doosjes "uitgerold" zijn.

Je hebt dus een lange strook karton nodig van
8x de lengte van een doosje. Rillen en vouwen
 op 1 kwart, de helft en op 3 kwart van de strook.

https://all4you-wilma.blogspot.com/2020/08/roldoosje-from-4-to-1-covered-in-bits.html
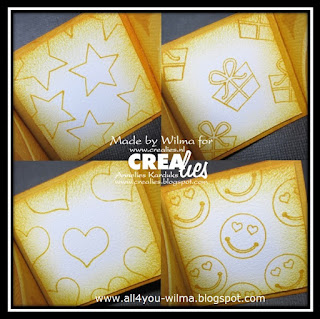
Aan de binnenkant heb ik stukjes fluweelkarton geplakt
 die ik voorzien heb van 4 verschillende stempeltjes.

https://all4you-wilma.blogspot.com/2020/08/roldoosje-from-4-to-1-covered-in-bits.html
En omdat de bovenzijde zo ontzettend mooi is
wil ik deze ook nog een keertje laten zien.

Kun jij met bovenstaande uitleg niet goed overweg,
zie jij liever e.e.a. in beeld uitgelegd.....kijk dan naar
deze 2 super handige video's, in het Nederlands
en in het Engels. Deze zijn gemaakt door Mandy.


Bedankt voor het langskomen en graag tot ziens.

Liefs Wilma

Crealies Stans/Die:

Crealies Stempels/Stamps:

Crealies Basis/Basic:

http://www.all4you-wilma.blogspot.com https://www.crealies.nl/nl/product/clcz25http://www.all4you-wilma.blogspot.com https://www.crealies.nl/nl/product/clbp140http://www.all4you-wilma.blogspot.com https://www.crealies.nl/nl/product/clbp143http://www.all4you-wilma.blogspot.com https://www.crealies.nl/nl/product/clbp151
http://www.all4you-wilma.blogspot.com https://www.crealies.nl/nl/product/clbp154http://www.all4you-wilma.blogspot.com https://www.crealies.nl/nl/product/clbp155http://www.all4you-wilma.blogspot.com https://www.crealies.nl/nl/product/clbp184
http://www.all4you-wilma.blogspot.com https://www.crealies.nl/nl/product/clbp188http://www.all4you-wilma.blogspot.com https://www.crealies.nl/nl/product/clbp200http://www.all4you-wilma.blogspot.com https://www.crealies.nl/nl/product/clbp201http://www.all4you-wilma.blogspot.com https://www.crealies.nl/nl/product/clfluweel

vrijdag 28 augustus 2020

Crealies, Doe meer met Mini Album Binder B.

 
Vandaag is Anneke onze guest designer.
Zij maakte dit mooie mapje.

Mijn post van vandaag is een mapje geworden met 5 theezakjes.

Snijd een stuk cardstock van 16,5 x 24 cm.
Ril deze op 7,5 - 9 cm.
Het designpapier is 0,5 cm kleiner. 
Er zitten 5 theezakjes in dit mapje.
Links onder is wat anders daarom ziet hij er ook anders uit!
 
Voor de vakjes heb de stans Mini Albums Binder B gebruikt.
Die heb ik daarna op 11 cm afgesneden.
Aan beide zijkanten een rillijn van 2,5 cm gemaakt.
Daarna ingeknipt en er een stukje afgehaald (zie foto).
Met dubbelzijdig tape heb ik hem in elkaar gezet.
Daarvoor heb ik een liniaal in het vakje gestopt om de vorm te behouden.


 Voor het mapje waar de thee in komt heb ik een stuk designpapier gesneden
 van 5,5 x 14,5 cm.
Ril dit op 2,5 - 9,5 cm.
Daarna heb ik de rillijnen gevouwen en bij het stukje van 2,5 cm onderin
 twee kleine nietjes gedaan.
Daar heb ik de theezakjes in gedaan.
 
 Het linker mapje is een klein notitie blokje.
Ik heb 6 papiertjes gesneden van 5 x 6,5 cm.
Dit heb ik vast gezet met 2 nietjes.
Daar kun je een persoonlijke boodschap inzetten als je dit cadeau wilt gegeven.
Het zou ook een uitnodiging voor een high tea kunnen zijn.
Ik heb alles met bloemetjes en blaadjes gedecoreerd.
 
Bedankt voor je bezoekje.
Groetjes, Anneke

Dit zijn de producten die ik heb gebruikt:

Crealies Stansen/Dies:
Mini Albums Bindsysteem B (rug 3 mm) met stippenlijn Set of 3 no. 60, Dichte bloemen 25 Duo Dies no. 57, Blaadjes 11

Anneke, bedankt voor je mooie creatie.
Deze is binnenkort ook te zien op Anneke's blog.

You might also like:

Related Posts Plugin for WordPress, Blogger...